4. What We Built
From concept to implementation to experience. What we built — “Nagesen Gacha Live” — is a product that realizes a simple idea with advanced technology.
User scenario
- Scene: the streamer’s room
- Setup: a gacha machine sits on the streamer’s desk; viewers watch it through the screen.
- Action: tipping
- Flow: the viewer opens a wallet and, with a click on the tipping button, completes a USDC payment.
- Reaction: the gacha machine spins. Upon payment confirmation, the machine on the other side of the screen starts moving. The LED shows the basename (or address) and amount, and you can hear the capsule rolling in real time.
- Share: spreading the experience. “Got a prize!” Share instantly on Farcaster. The record can be verified on Basescan.
Seamless integration with social (Farcaster) enhances the experience. Being able to share the gacha result instantly on social media turns “sharing the experience” into a mechanism that drives virality. As Mini Apps roll out across platforms, we expect to provide consistent interactions.
Technical overview
“Nagesen Gacha Live” is an IoT × blockchain platform that remotely operates ESP32 devices (e.g., gacha machines) triggered by USDC payments on Base L2. Inspired by the X402 protocol, an extension of HTTP 402 (Payment Required), it connects micropayments with real‑time control.
- Concept: from “tipping = support” to “tipping = participation.” Payments directly trigger physical device actions.
Key features
- Real‑time control: immediate command delivery via WebSocket
- On‑chain payments: USDC on Base Network
- X402‑style payment requests: 402 responses carry payment requirements and signatures
- Live video: watch device actions in real time
- Pricing: per‑device variable or fixed fees
- Security: HMAC‑SHA256 signatures, nonce/expiry, on‑chain verification
System examples
- Nagesen Gacha Live (ESP32_001)
- Type: gacha machine / Price: variable (default $0.000 USDC) / Note: tip‑jar style
- Gacha Live Demo (ESP32_002)
- Type: gacha machine / Price: fixed $0.123 USDC / Note: fixed‑price demo
Reference architecture diagram:
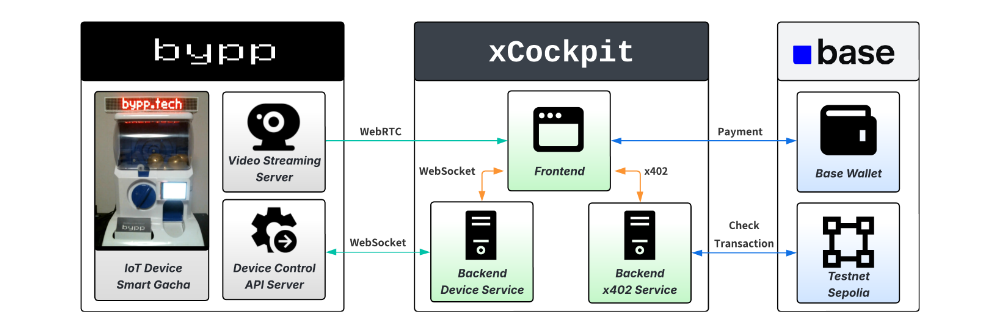
Tech stack
- Frontend: React 18 + Vite 5 / Radix UI / Tailwind CSS / TanStack Query
- Wallet integration: Coinbase Wallet SDK, OnchainKit
- Backend: Node.js + TypeScript / Express / ws
- Blockchain: Base (Mainnet 8453 / Sepolia 84532), ethers.js v6, USDC (ERC‑20)
X402‑based flow (overview)
- Client requests a device action
- Server responds with 402 (Payment Required) including requirements and signature
- User executes USDC payment via wallet
- Server verifies payment on‑chain
- On success, server sends command to ESP32 → execution
API endpoints (excerpt)
- Devices:
GET /api/devices,GET /api/devices/:id,POST /api/devices/:id/commands/:command,POST /api/devices/:id/fee,GET /api/devices/:id/fee - Payments:
POST /api/payments/verify,GET /api/payments/:walletAddress - System:
GET /api/websocket/status,GET /api/admin/health
Setup (quick)
Prereqs: Node.js 18+, npm or yarn, MetaMask/Coinbase Wallet
- Install dependencies
npm install
- Configure environment variables (example)
cp .env.example .env
.env example:
NETWORK=your_network_here
BASE_SEPOLIA_RPC=https://your_rpc_endpoint_here
BASE_SEPOLIA_USDC=0x036CbD53842c5426634e7929541eC2318f3dCF7e
X402_HMAC_SECRET=your_secret_key_here
PAYMENT_RECIPIENT=0xYourRecipientAddressHere
VITE_API_URL=http://localhost:5000
VITE_WS_URL=ws://localhost:5000
- Start development (example)
# Backend
npm run dev

# Frontend (separate terminal)
cd client
npm run dev
How to use (example)
- Connect a wallet via “Connect Wallet” (top right)
- For variable‑fee devices, set the amount via “Set Fee”
- Click “Play Gacha,” approve payment → device runs automatically
- Watch the live video on the left
References:
- Base Network (https://base.org)
- X402 (https://x402.org)
- Coinbase Wallet SDK (https://docs.cloud.coinbase.com/wallet-sdk/docs)